如果没有搭建博客,请按照Hexo博客的教程搭建一个博客,本地搭建好后再进行更改即可集成FlowUs作为写作平台。
本教程需要两个仓库,一个用于存放Hexo,一个用于存放生成的静态文件。
例如:
Flowus-Hexo 用于存放Hexo。
用户名.github.io 用于存放生成的静态文件。
下面教程使用这两个仓库名进行区别两个仓库。

部署思路大致如上图所示。
部署指北#
安装Elog#
1
|
npm install @elog/cli -g
|
初始化#
根据提示初始化成功后,会在根目录生成一份 elog.config.js 配置文件和本地调试用的.elog.env环境变量配置文件。
配置FlowUs#
-
使用 Database 模板 创建一个多维表
-
获取多维表的 tablePageId

修改.elog.env#
在文件中FLOWUS_TABLE_PAGE_ID=后加上上面获取的tablePageId
修改elog.config.js文件#
参考如下
 1
 2
 3
 4
 5
 6
 7
 8
 9
10
11
12
13
14
15
16
17
18
19
20
21
22
|
module.exports = {
  write: {
    platform: 'flowus',
    flowus: {
      tablePageId: process.env.FLOWUS_TABLE_PAGE_ID,
      filter: { property: 'status', value: '已发布' }
    }
  },
  deploy: {
    platform: 'local',
    local: {
      outputDir: './source/_posts',
      filename: 'title',
      format: 'markdown',
      frontMatter: {
        enable: true,
        include: ['categories', 'tags', 'title', 'date', 'updated', 'permalink', 'cover', 'description'],
        timeFormat: true,
      },
    },
  }
}
|
详细说明见:https://elog.1874.cool/notion/write-platform#flowus-%E6%81%AF%E6%B5%81
本地调试#
使用命令elog sync -e .elog.env尝试进行同步。同步前前先确保FlowUs表格中有文档处于已发布状态!
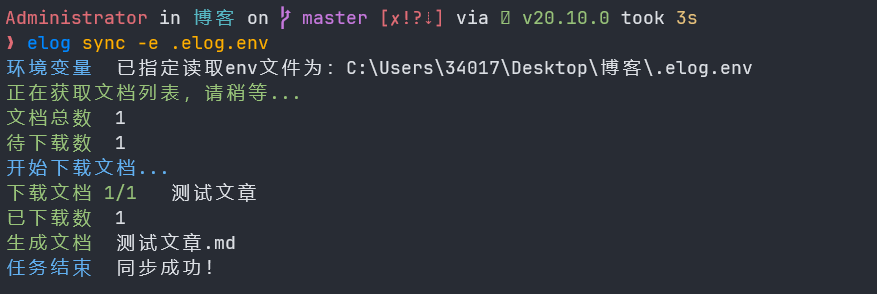
如果和上图一样同步成功,没有报错,即可进行下一步。
创建.gitignore文件#
参考内容如下:
1
2
3
4
5
6
7
8
|
.DS_Store
Thumbs.db
db.json
*.log
node_modules/
public/
.deploy*/
.elog.env
|
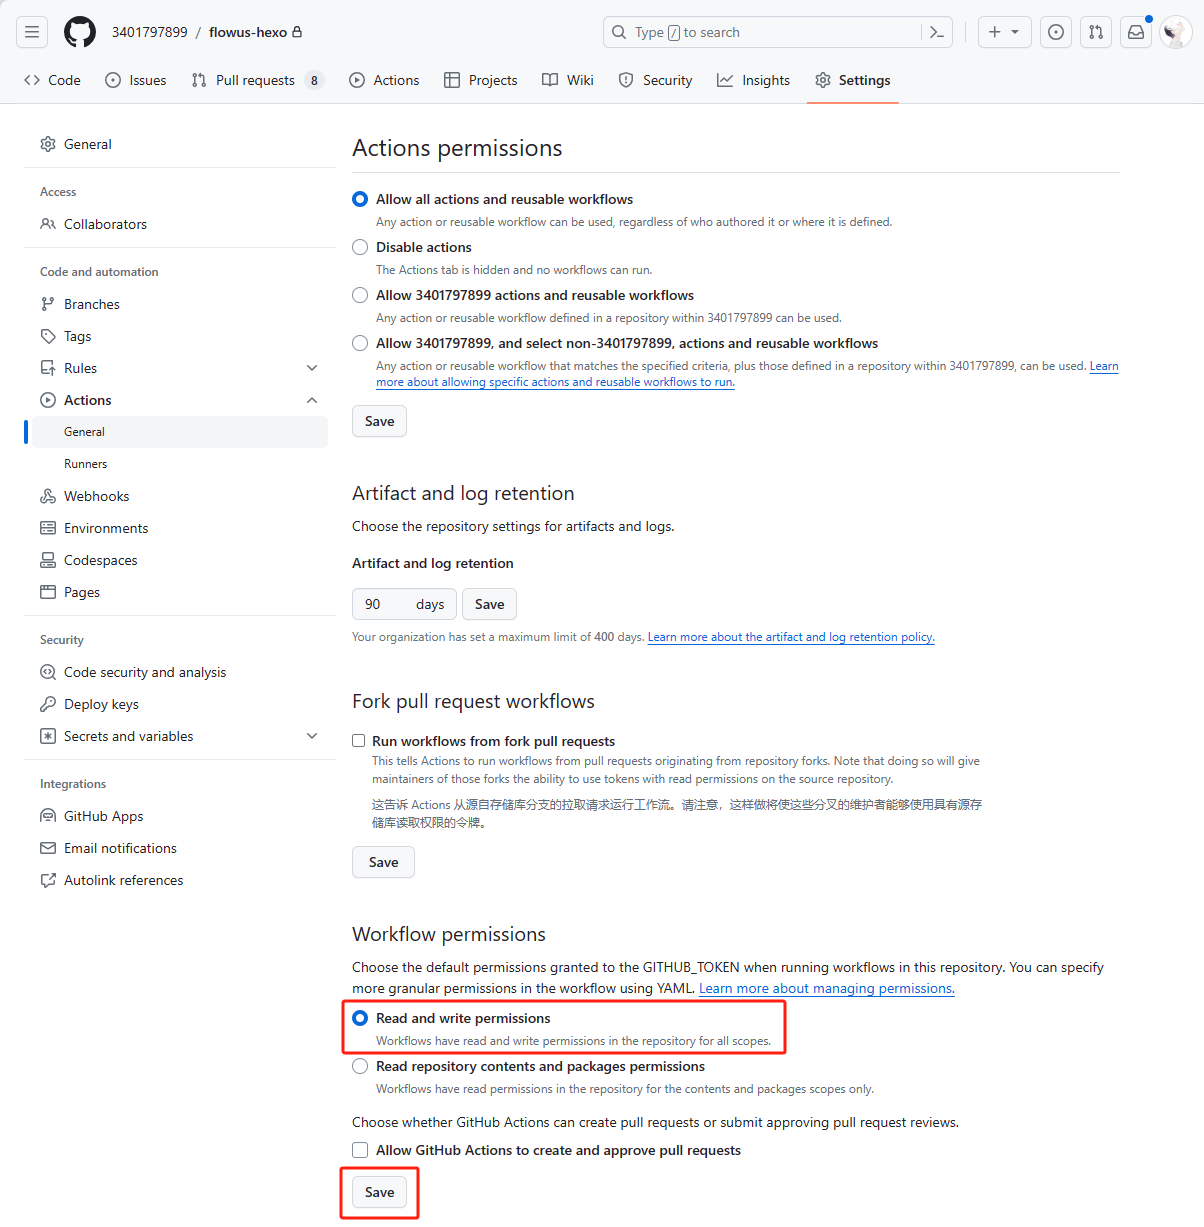
配置Github Action权限#
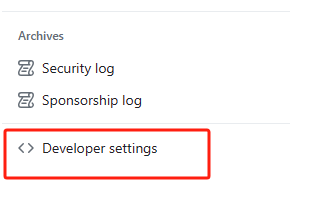
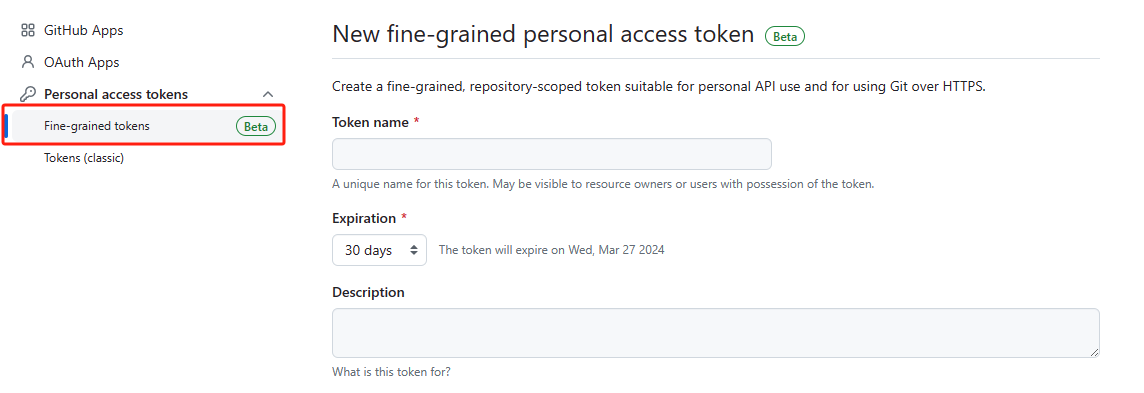
申请Token#
Settings→Developer settings
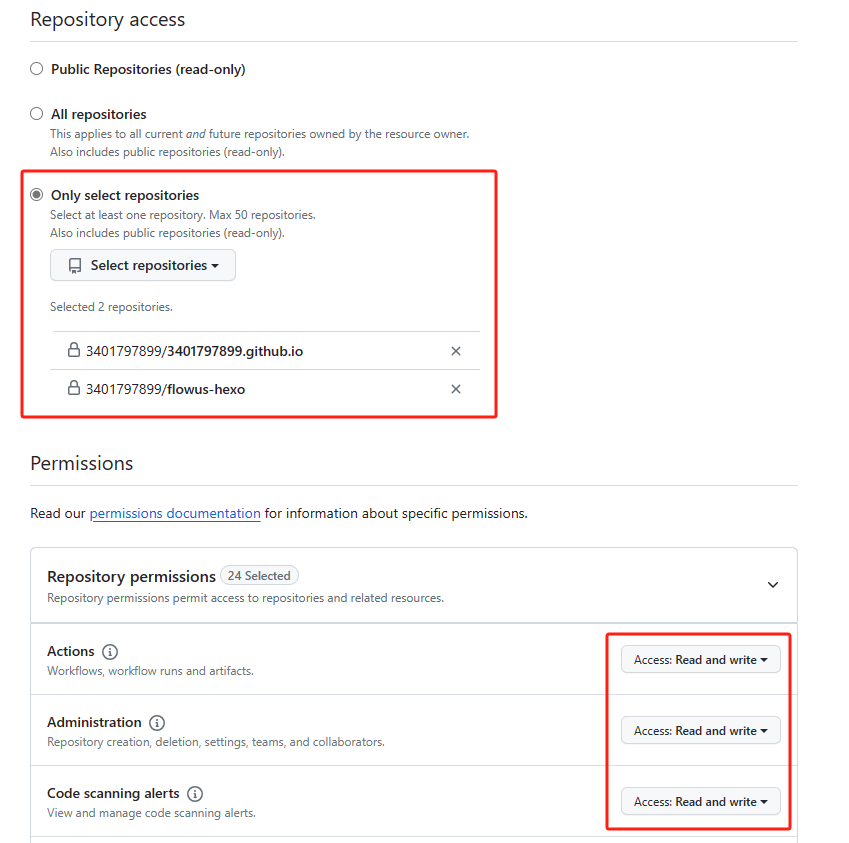
权限尽量全选Read and write。
配置secrets#
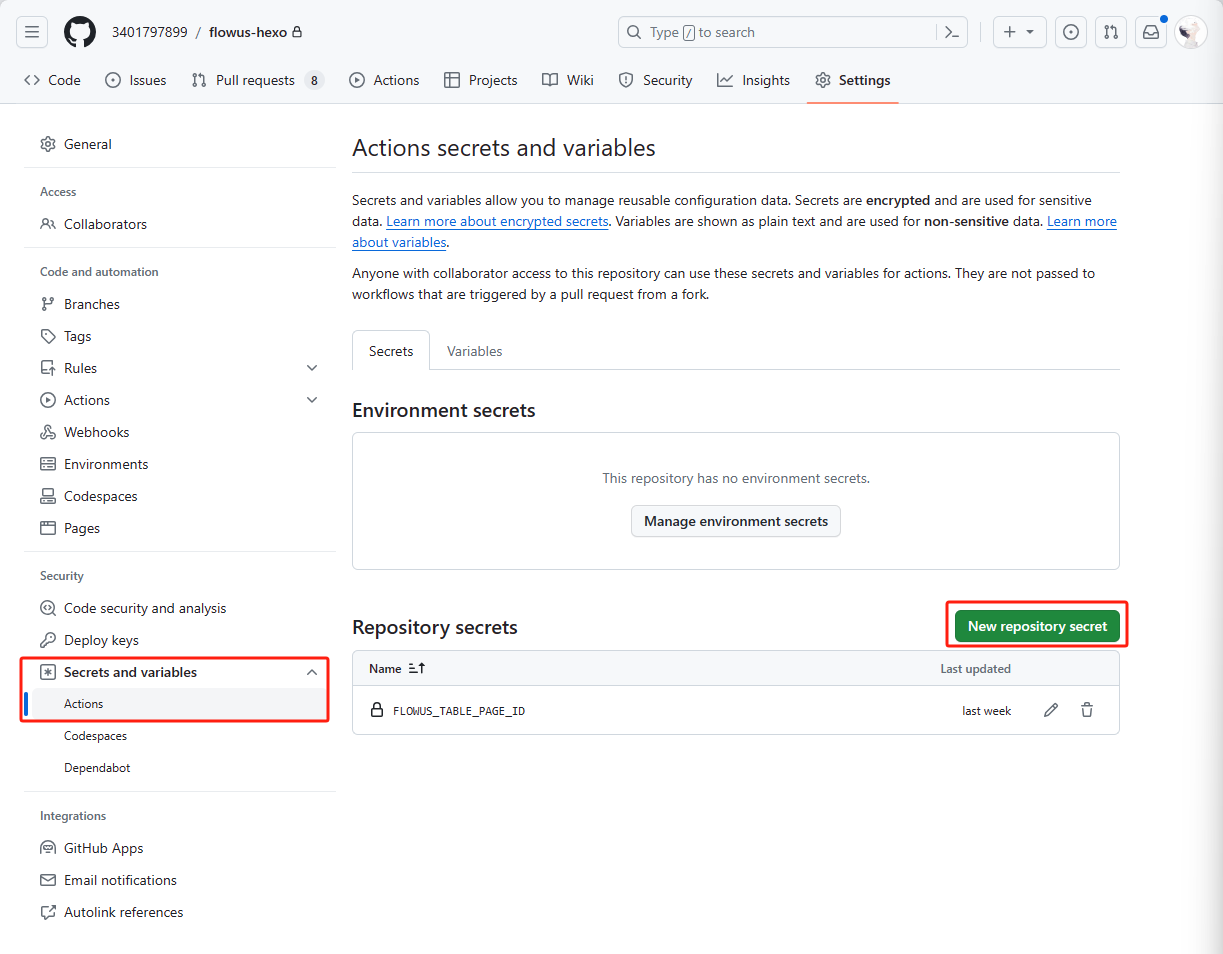
| Name |
Secret |
| FLOWUS_TABLE_PAGE_ID |
FlowUs的tablePageId |
| TOKEN |
GitHub |
| USER |
Github用户名 |
创建Github Action文件#
在目录.github/workflows目录下创建sync.yaml文件,参考内容如下。
 1
 2
 3
 4
 5
 6
 7
 8
 9
10
11
12
13
14
15
16
17
18
19
20
21
22
23
24
25
26
27
28
29
30
31
32
33
34
35
36
37
38
39
40
41
42
43
44
45
46
47
48
49
50
51
52
53
54
55
56
57
58
59
|
name: Sync Docs

on:
  # 允许手动push触发
  # push:
  #   branches:
  #     - master
  # 允许外部仓库事件触发
  repository_dispatch:
    types:
      - deploy

jobs:
  build:
    runs-on: ubuntu-latest

    steps:
      - name: 检查分支
        uses: actions/checkout@master

      - name: 安装node环境
        uses: actions/setup-node@master
        with:
          node-version: "16.x"

      - name: 安装依赖
        run: |
          export TZ='Asia/Shanghai'
          npm install --prod
          npm install @elog/cli -g

      - name: 拉取文档并生成静态文件
        env:
          FLOWUS_TABLE_PAGE_ID: ${{ secrets.FLOWUS_TABLE_PAGE_ID }}
        run: |
          elog sync --force
          npm run build

      - name: 推送静态文件到仓库
        run: |
          cd public
          git init
          git config --global user.name "github-actions[bot]"
          git config --global user.email "github-actions[bot]@users.noreply.github.com"
          git add .
          git commit -m "Flowus Sync"
          git push --set-upstream --force --quiet "https://oauth2:${{ secrets.TOKEN }}@github.com/${{ secrets.USER }}/${{ secrets.USER }}.github.io.git" master

      - name: 提交文章更新
        run: |
          git add .
          git commit -m "Sync Docs"

      - name: 备份文章到本仓库
        uses: ad-m/github-push-action@master
        with:
          github_token: ${{ secrets.TOKEN }}
          branch: master
          force: true
|
提交代码到Github#
使用Git提交到Flowus-Hexo仓库。
手动触发#
使用Elog提供的部署在 Vercel 的免费公用的ServerlessAPI,只需要配置好 URL 参数并浏览器访问即可触发流水线。
1
|
https://serverless-api-elog.vercel.app/api/github?user=xxx&repo=xxx&event_type=deploy&token=xxx
|
| 参数 |
说明 |
| user |
Github用户名 |
| repo |
Flowus-Hexo |
| token |
Github |
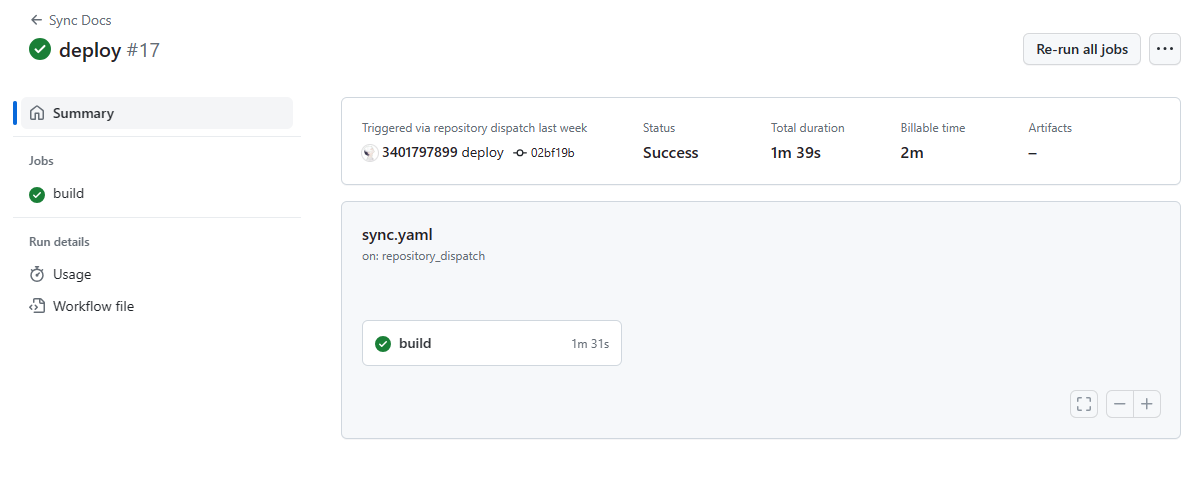
如果成功的话,可以在Action中看到成功执行了。
Vercel关联部署#
FlowUs中的图片地址有效期约为1h,过期后会显示404,需要将图片上传到图床进行使用。
个人使用的是Github图床,其他图床请参考官方文档。
修改elog.config.js#
 1
 2
 3
 4
 5
 6
 7
 8
 9
10
11
12
13
14
15
16
17
18
19
20
21
22
23
24
25
26
27
28
29
30
31
32
33
34
|
module.exports = {
  write: {
    platform: 'flowus',
    flowus: {
      tablePageId: process.env.FLOWUS_TABLE_PAGE_ID,
      filter: { property: 'status', value: '已发布' }
    }
  },
  deploy: {
    platform: 'local',
    local: {
      outputDir: './source/_posts',
      filename: 'title',
      format: 'markdown',
      frontMatter: {
        enable: true,
        include: ['categories', 'tags', 'title', 'date', 'updated', 'permalink', 'cover', 'description'],
        timeFormat: true,
      },
      formatExt: './format-image.js'
    },
  },
  image: {
    enable: true,
    platform: 'github',
    enableForExt: true,
    github: {
      token: process.env.PIC_UPLOAD_TOKEN,
      user: '用户名',
      repo: '图床仓库',
      prefixKey: 'pics/',
    }
  }
}
|
 1
 2
 3
 4
 5
 6
 7
 8
 9
10
11
12
13
14
15
16
17
18
19
20
21
22
23
24
25
|
const { matterMarkdownAdapter } = require('@elog/cli')

/**
 * 自定义文档处理器
 * @param {DocDetail} doc doc的类型定义为 DocDetail
 * @param {any} imageClient 图床下载器
 * @return {Promise<DocDetail>} 返回处理后的文档对象
 */
const format = async (doc, imageClient) => {
  const cover = doc.properties.cover
  // 将 cover 字段中的图片下载到本地
  if (imageClient && cover) {
    // 只有启用图床平台image.enable=true时,imageClient才能用,否则请自行实现图片上传
    const url = await imageClient.uploadImageFromUrl(cover, doc)
    // cover链接替换为本地图片
    doc.properties.cover = url
  }
  doc.body = matterMarkdownAdapter(doc);
  return doc;
};

module.exports = {
  format,
};
|
修改sync.yaml#
 1
 2
 3
 4
 5
 6
 7
 8
 9
10
11
12
13
14
15
16
17
18
19
20
21
22
23
24
25
26
27
28
29
30
31
32
33
34
35
36
37
38
39
40
41
42
43
44
45
46
47
48
49
50
51
52
53
54
55
56
57
58
59
60
61
62
|
name: Sync Docs

on:
  # 允许手动push触发
  push:
    branches:
      - master
  # 允许外部仓库事件触发
  repository_dispatch:
    types:
      - deploy

jobs:
  build:
    runs-on: ubuntu-latest

    steps:
      - name: 检查分支
        uses: actions/checkout@master

      - name: 安装node环境
        uses: actions/setup-node@master
        with:
          node-version: "16.x"

      - name: 安装依赖
        run: |
          export TZ='Asia/Shanghai'
          npm install --prod
          npm install @elog/cli -g

      - name: 拉取文档并生成静态文件
        env:
          FLOWUS_TABLE_PAGE_ID: ${{ secrets.FLOWUS_TABLE_PAGE_ID }}
          GITHUB_TOKEN: ${{ secrets.PIC_UPLOAD_TOKEN }}
          ELOG_GITHUB_USER: ${{ secrets.USER }}
          ELOG_GITHUB_REPO: ${{ secrets.PIC_REPO }}
        run: |
          elog sync --force
          npm run build

      - name: 推送静态文件到仓库
        run: |
          cd public
          git init
          git config --global user.name "github-actions[bot]"
          git config --global user.email "github-actions[bot]@users.noreply.github.com"
          git add .
          git commit -m "Flowus Sync"
          git push --set-upstream --force --quiet "https://oauth2:${{ secrets.TOKEN }}@github.com/${{ secrets.USER }}/${{ secrets.USER }}.github.io.git" master

      - name: 提交文章更新
        run: |
          git add .
          git commit -m "Sync Docs"

      - name: 备份文章到本仓库
        uses: ad-m/github-push-action@master
        with:
          github_token: ${{ secrets.TOKEN }}
          branch: master
          force: true
|
创建上传图片Token#
在Github创建一个能上传图片到图床仓库的token。
添加secrets#
| Secret |
Name |
| 上传图片Token |
PIC_UPLOAD_TOKEN |
| 图床仓库名称 |
PIC_REPO |
大功告成。